2015. 12. 25. 09:51ㆍIT&모바일&컴퓨터
(1 탄이라고 썼지만, 2탄은 언제 나올지 모른다.)
Windows7 에서 쓸데없는 폴더나 화일을 찾아 지워서, 디스크(컴퓨터) 용량을 확보하자!
1탄 - SpaceSniff 사용하기
1. SpaceSniff
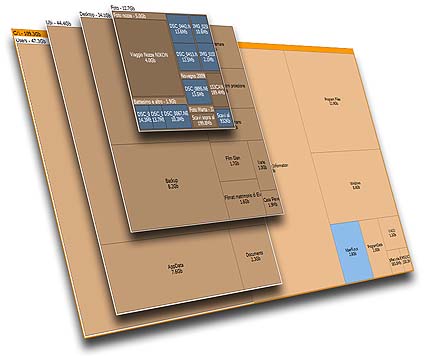
다음 처럼 폴더별 사용용량을 체크할 수 있도록 Portable로 제공하고 있다. (http://www.fosshub.com/SpaceSniffer.html)

1.1 다운받아 실행시키면 아래처럼 Windows/Install 가 25.6 GB 나 차지하고 있는 것을 알 수 있다.
1.2 그중에서 $PatchCache$ 는 어떤 프로그램을 패치할 때 이전 파일이 저장되는 폴더이다. 그 아래 Manage 폴더안에 있는 숨은 폴더등을 삭제! (자세한 것은 여기를 참조.)
그래서 현재 패치된 현재 프로그램을 이전 상태로 돌릴 일이 없다면 삭제가능하다.
Baseline cache for patching and patch removal
Windows Installer 3.0 added support to uninstall patches and to provide a more robust experience for applying binary deltas to existing files without accounting for every possible state an existing file could be in. That is, if a patch were to updatefoo.dll v1 to foo.dll v2 using a binary delta applied to foo.dll, the patch would have to account for foo.dll v3 or even having been updated by another product installation, or the installation would fail.
To make either of these features possible, Windows Installer copies files to be updated to the baseline cache under%WINDIR%\Installer\$PatchCache$ for each product. At most, there might be two copies of files created since Windows Installer retains a copy of the original (RTM) file and the latest minor upgrade (often distributed as "service packs") when either version of a file is initially replaced.
Since Windows Installer only copies a file to be updated to the baseline cache if the file will be overwritten, a baseline cache for a file might only exist for one product even if updated by a patch for multiple installed products. This can lead to source media requirements when some products are updated. Windows Installer 4.5 provides a feature to fix this by copying shared files to all products' baseline caches that installed those files - thus increasing disk space consumption. This improves servicing scenarios but at the cost of additional disk space.
These files are located under %WINDIR%\Installer\$PatchCache$ in a per-product location.
These files can be deleted or the baseline cache disabled using the MaxPatchCacheSize policy but when uninstalling a patch or when restoring missing files you will be prompted for source if a user interface is displayed; otherwise, the installation attempt will simply fail.
삭제는 $PatchCache$ 밑의 Manage 폴더 아래를 삭제해주었으며, 위의 나온 것 처럼 MaxPatchCacheSize policy를 0으로 설정해주면, 패치 이전이 저장되지 않는다. 레지스트리의 값은 디스크용량의 %까지를 패치이전 baseline 저장에 쓰겠다는 것이다.
1.3 따라서 다음 페이지에 따라 레지스트리를 추가하면 다시 저 폴더에 패치이전 내용들이 저장되지 않는다.
(관련 내용) https://msdn.microsoft.com/en-us/library/windows/desktop/aa369798(v=vs.85).aspx
MaxPatchCacheSize - Win32 apps
이 컴퓨터별 시스템 정책이 0보다 큰 값으로 설정되는 경우 Windows Installer는 패치가 애플리케이션에 적용될 때 이전 버전의 파일을 캐시에 저장합니다.
learn.microsoft.com
내컴퓨터->실행->Regedit(엔터)->(관리자권한승인)->HKEY_LOCAL_MACHINE\SOFTWARE\Policies\Microsoft\Windows 에서 키값(Installer)생성후->그안에서 MaxPatchCacheSize 값 생성하여 REG_DWORD 값 선택하고 값은 '0'으로 넣어주기
이것을 지움으로 나는 3.6GB 정도를 save하였다.
1.4 spacesniff를 잘 찾아보면 나도 모르는 용량 많은 폴더들을 발견할 수 있을 것이다.
나는 갤럭시 kies의 새버전인 smart switch가 document\samsung\ 에 백업들을 위치해주어서 예전 백업들을 지워서 결국 12GB 를 줄일 수 있었다.
'IT&모바일&컴퓨터' 카테고리의 다른 글
| SKT 사용자인데 타 통신사(KT, LG) 기기 사용중일 때, TMAP 사용하기 (0) | 2016.01.18 |
|---|---|
| 디스크에서 쓸데없는 폴더 찾아 지우기 (컴퓨터 용량 늘리기) - 2탄 (0) | 2016.01.01 |
| mobilegames 광고 제거하기 - 1탄 (0) | 2015.11.20 |
| 터미널 시리얼 프로그램의 최강자 Terminal 1.9 (2) | 2015.10.21 |
| 설치 버튼 안눌러짐 안드로이드 (0) | 2015.08.28 |

